> ## Documentation Index
> Fetch the complete documentation index at: https://docs.trychert.com/llms.txt
> Use this file to discover all available pages before exploring further.
# Onboarding
> Seven steps from package install to first verified send. ~30 minutes.
Most setup happens on Chert's side before you install. The seven steps
below are the only customer-side work; total time is \~30 minutes plus
one short pairing call with Chert during step 5.
**Before the pairing call:** Steps 1–4 should already be complete in
your sandbox. The call covers step 5 (credential paste + verify) and
step 6 (Slack channel install). Have on hand: a sandbox admin login, a
test Lead with a real mobile number you control, and a workspace admin
who can authorize the Slack OAuth install. Plan \~30 minutes.
## What you do, what Chert does
| Step | Owner | Time |
| -------------------------------------------------------------------- | -------------------- | ------ |
| 1. Install the package into your Org | You | 5 min |
| 2. Assign the **Chert Messaging User** Permission Set | You | 2 min |
| 3. Add the `chertConversation` component to record pages | You | 5 min |
| 4. Add Quick Actions to Contact list views | You | 5 min |
| 5. Configure the `Chert_Tenant.Default` Custom Metadata record | You + Chert (paired) | 5 min |
| 6. Connect the Slack channel for reply notifications | Chert | — |
| 7. (Optional) Wire a Flow handoff from your existing email sequencer | You | 10 min |
Project-side setup, sequence templates, phone-line provisioning, and
console configuration are handled by Chert before you install.
## Before You Begin
| Requirement | How to verify |
| ---------------------------------------- | ------------------------------------------------------------------------------------------------------------------------------------------ |
| Lightning Experience enabled | From Setup, search **Lightning Experience Transition Assistant**. Status must be **turned on for all users**. |
| My Domain deployed to users | From Setup, search **My Domain**. Step 4 (**Deploy to Users**) must be complete. |
| API enabled on the Org's edition | Enterprise, Unlimited, Performance, and Developer Editions include API. Professional requires the API add-on. Essentials is not supported. |
| Installer is a System Administrator | The user must hold **Download AppExchange Packages**, **Customize Application**, and **Modify Metadata Through Metadata API Functions**. |
| Outbound HTTPS to `console.trychert.com` | If your Org enforces an outbound IP allowlist, allow the Chert API host. |
| Salesforce CLI installed locally | Run `sf --version`. Must be **2.0.0 or later**. Install via `npm install -g @salesforce/cli`. |
| Chert tenant credentials | Confirm with Chert that you have a `tenant_slug`, `signing_secret`, and `ingest_token` in hand before step 5. |
## The seven steps
Chert is a Managed 2GP package. Install into a sandbox first,
smoke-test, then install the same link into production.
**Install links** (current version `0.1.0-2`):
| Environment | URL |
| ----------- | ------------------------------------------------------------------------------------------------------------------------------------------------------------------------ |
| Sandbox | [`https://test.salesforce.com/packaging/installPackage.apexp?p0=04tg50000006i4nAAA`](https://test.salesforce.com/packaging/installPackage.apexp?p0=04tg50000006i4nAAA) |
| Production | [`https://login.salesforce.com/packaging/installPackage.apexp?p0=04tg50000006i4nAAA`](https://login.salesforce.com/packaging/installPackage.apexp?p0=04tg50000006i4nAAA) |
Both links install the same package version. Sandbox uses
`test.salesforce.com`; production uses `login.salesforce.com`.
**Install into the sandbox first:**
1. Click the **sandbox** link above. Salesforce prompts you to log in.
2. Log in with a sandbox System Administrator account.
3. On the **Install Chert Messaging** screen, choose **Install for Admins Only**. (You'll grant end-user access via the Permission Set in step 2 — installing for All Users right away skips the Permission Set discipline.)
4. Click **Install**. The install takes 2–5 minutes for a fresh org, longer if there are many existing automations.
5. When the screen shows **Installation Complete**, you're done with the sandbox install.
**Install into production** (after smoke-testing the sandbox install
through steps 2–5):
Repeat the same flow with the **production** link. The package
version ID is identical — what changes is which Org you authenticate
into.
**Why "Install for Admins Only"?** It defers user access until the
Permission Set is assigned in step 2, so end users can never see the
component before you've explicitly granted them access. This is the
Salesforce-recommended pattern for ISV packages.
**Verify the install:**
1. From Setup, search **Installed Packages** → confirm **Chert Messaging** appears with the expected version number.
2. From Setup, search **Setup Audit Trail** → search for `Chert_` to see the per-component install entries.
3. From Setup → **Object Manager** → **Contact** → **Fields & Relationships** → confirm these custom fields exist:
* `Chert_Phone_Confidence__c`
* `Chert_Phone_Source__c`
* `LinkedIn_URL__c`
* `Chert_Last_Enriched_At__c`
* `Chert_Enrichment_Status__c`
If any of those are missing, the install completed partially. Re-run
the install link; Salesforce will reconcile.
**Common install failures:**
| Symptom | Cause | Fix |
| ------------------------------------------- | ---------------------------------------------------------------------------- | ----------------------------------------------------------------------------------------------- |
| `Install failed: FIELD_INTEGRITY_EXCEPTION` | Your Org has a custom field with the same API name as one in the package | Tell Chert which field conflicts; we can rename the package field and reissue the install link. |
| `Install failed: API access required` | Org edition lacks API access (e.g., Essentials, Professional without add-on) | Confirm prerequisites in **Before You Begin**. |
| `User Doesn't Have Access` after install | The installer's profile lacks **Download AppExchange Packages** | Re-run as a System Administrator. |
**Alternate path for source-tree deployments.** If your team prefers
deploying from source rather than a packaged install — for example,
to integrate Chert into your existing CI/CD pipeline — Chert can
provide the metadata source. Contact `contact@trychert.com`. The
install-link path documented above is recommended for everyone else.
Salesforce best practice is Permission Set assignment, not Profile
modification. The package contains no Profiles.
1. From Setup, enter **Permission Sets**.
2. Click **Chert Messaging User**.
3. Click **Manage Assignments** → **Add Assignments**.
4. Select the users who will send or review iMessages, then click **Assign**.
For larger rollouts, group **Chert Messaging User** into a Permission
Set Group alongside any role-specific Permission Sets.
**What this grants:** Read + Create on `Chert_Message__c`, Read + Edit
on the Chert-prefixed Contact and Lead enrichment fields, Apex class
access for the eight package classes, and Named Credential access to
`Chert_Endpoint`. No `View All Data`, no `Modify All Data`. Full
breakdown in [Configuration](/salesforce/configuration).
**Verify:**
* From Setup → **Permission Sets** → **Chert Messaging User**, confirm the user count under **Manage Assignments** matches what you assigned.
* Sign in as one of the assigned users (use the **Login As** option from Setup → **Users**) and confirm Step 3's component appears.
For Orgs running Permission Set Groups: create a group named e.g.
**Chert Outbound** that contains **Chert Messaging User** plus your
existing **Sales Rep** Permission Set. Assign the group rather than
the individual Permission Sets — easier to manage at scale and the
audit trail is cleaner.
The package ships three pre-configured Lightning Record Pages. You
activate them per Org, App, or record-type/profile combination.
1. From Setup, enter **Lightning App Builder**.
2. For each of the three shipped pages, click the page name then click **Activation**:
* `Lead Record Page Chert`
* `Contact Record Page Chert`
* `Account Record Page Chert` (optional)
3. Choose the activation scope:
* **Org Default** — applies to every Lead/Contact/Account record across the Org.
* **App Default** — scoped to one Lightning app (e.g., Sales Console).
* **Profile / Record Type** — narrowest; assign only to specific profiles or record types.
4. Click **Save**.
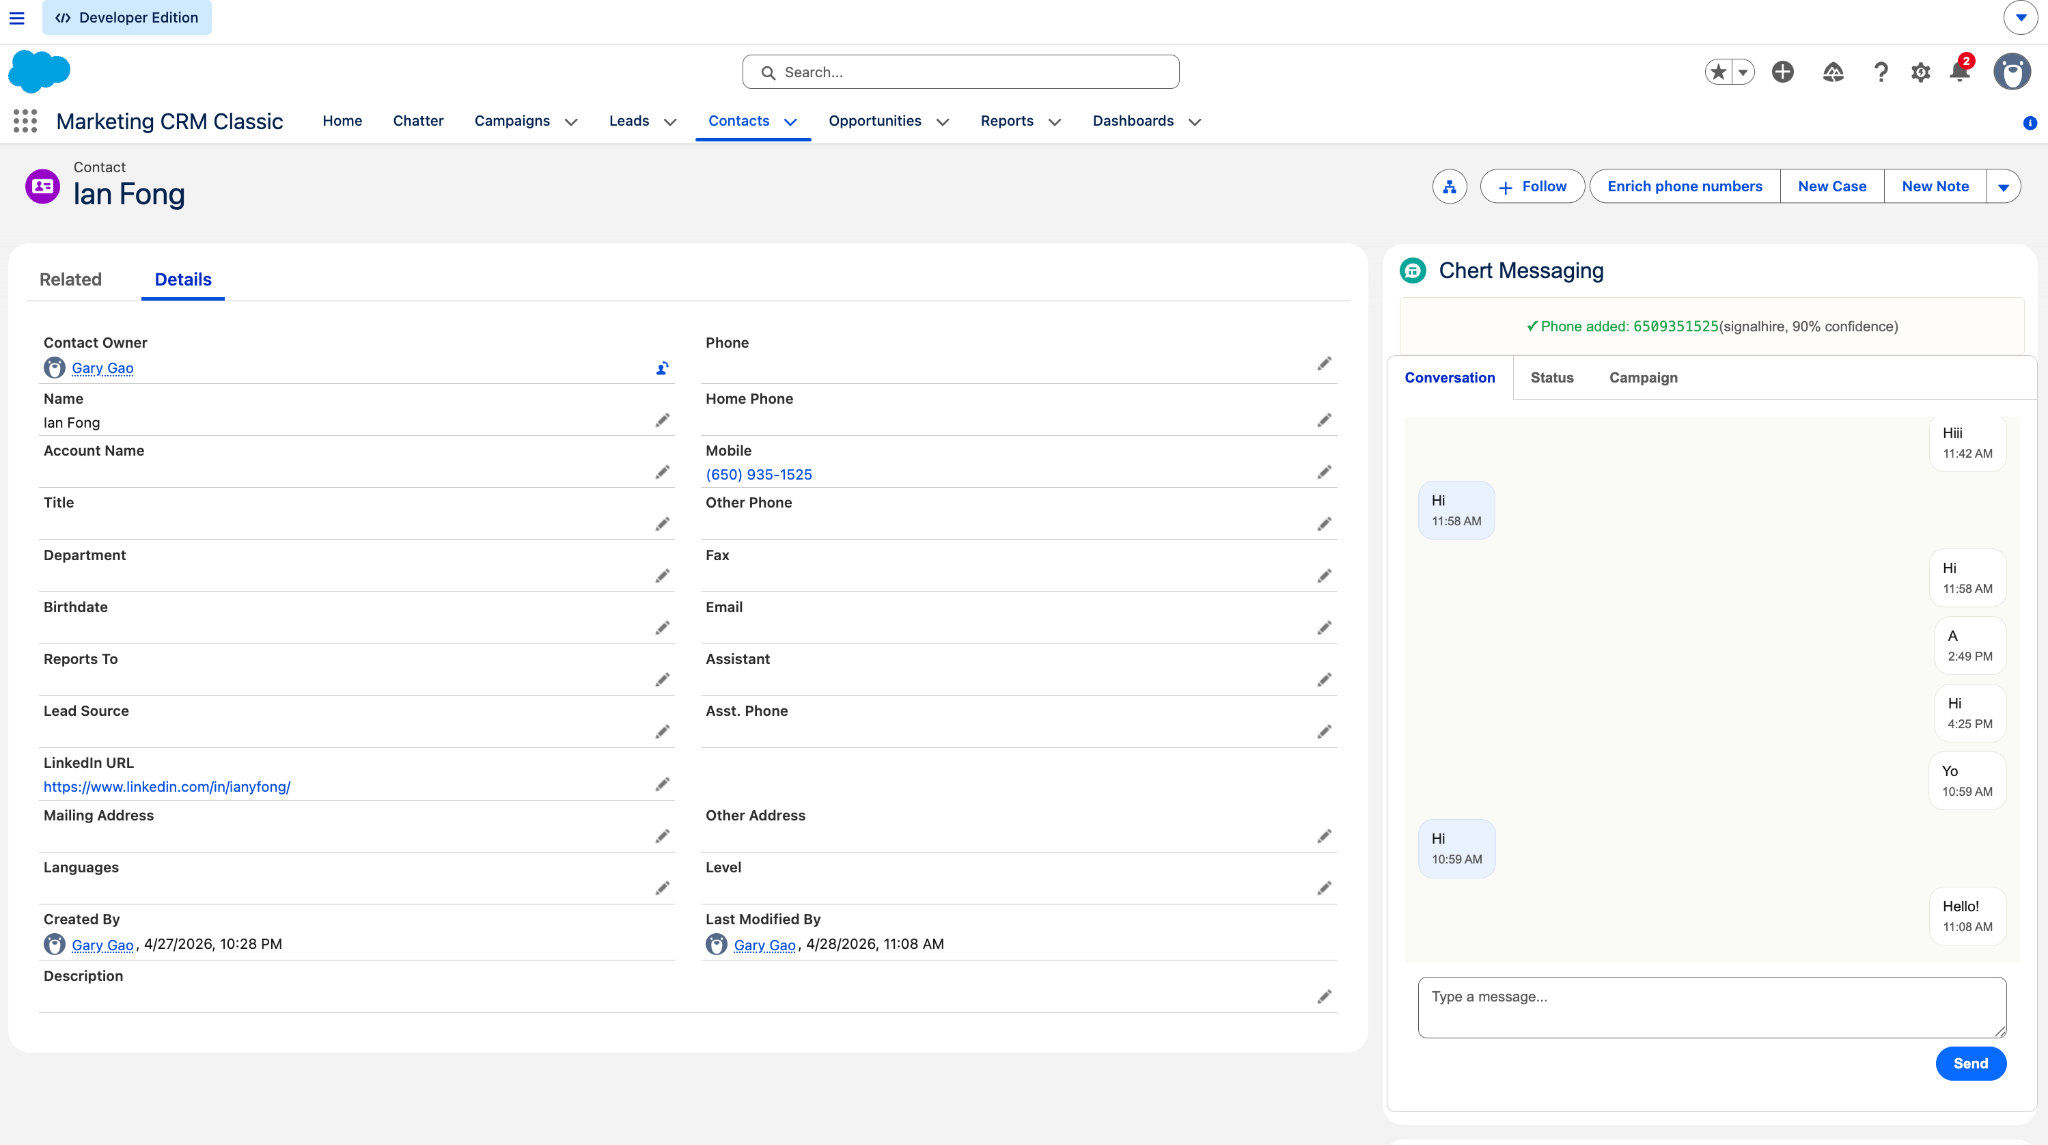
**Verify:** Open any Lead, Contact, or Account record. The **Chert
Messaging** component appears in the right-rail with three tabs:
**Conversation**, **Status**, and **Campaign**.
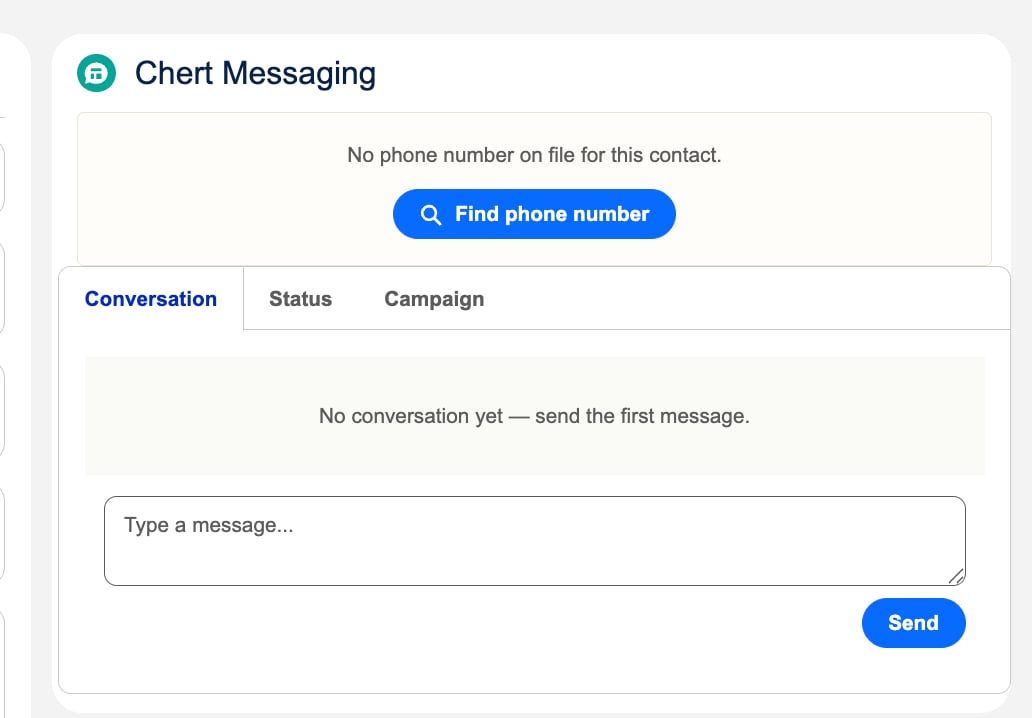
 If the Contact has no phone number on file, the same component renders
its empty state with a **Find phone number** action that triggers the
enrichment pipeline:
If the Contact has no phone number on file, the same component renders
its empty state with a **Find phone number** action that triggers the
enrichment pipeline:
 Activation is **per-environment**. A sandbox-active page does not
auto-activate in production. Repeat this step on each Org you deploy to.
If your Org already has a customized Lead/Contact record page, you can
skip the shipped Flexipages and instead drop the `chertConversation`
LWC component directly onto your existing page from Lightning App
Builder. The component is exposed under the **Custom — Managed**
section of the components palette.
Two Quick Actions ship with the package and need to be exposed on
Contact list views so reps can run them in bulk.
| Quick Action | Component | Purpose |
| ---------------------- | ----------------------- | ----------------------------------------------------------- |
| `Enrich_Phone_Numbers` | `chertBulkEnrich` | Bulk-enrich missing mobile numbers across selected Contacts |
| `Start_Chert_Sequence` | `chertSequenceLauncher` | Enroll selected Contacts into a Chert sequence |
To expose them on the Contact list view:
1. From Setup → **Object Manager** → **Contact** → **Search Layouts for Salesforce Classic** (or **List View Button Layout** in Lightning).
2. Edit the **List View** layout.
3. Add **Enrich Phone Numbers** and **Start Chert Sequence** to the **Selected Buttons** list.
4. Save.
**Verify:** Open the Contacts tab in Lightning Experience, switch to
any list view with selectable rows, select a few Contacts, and confirm
both Quick Action buttons appear in the action bar.
**Checkpoint — you should now be able to:**
* Open any Lead, Contact, or Account record and see the three-tab Chert Messaging component
* Open the Contacts list view, select rows, and see the **Enrich Phone Numbers** + **Start Chert Sequence** buttons
* See `Chert_Message__c` and `Chert_Tenant__mdt` in **Object Manager**
* Find **Chert Messaging User** under Permission Sets
If any of those are missing, fix before moving to step 5. Step 5
sends real network traffic to Chert and assumes the package is fully
installed and assigned.
This step pastes the credentials Chert provisioned for your Org into
the package's tenant configuration. Most customers do this on a
30-minute pairing call with Chert; the call confirms credentials are
correct before any traffic flows.
1. From Setup, enter **Custom Metadata Types**.
2. Click **Manage Records** next to **Chert Tenant**.
3. Edit the **Default** record.
4. Paste these values from your Chert onboarding handoff:
* `Tenant_Slug__c` — your Org's identifier with Chert
* `Signing_Secret__c` — HMAC-SHA256 key for outbound requests
* `Ingest_Token__c` — bearer token Chert presents on inbound webhooks
* `Chert_Base_URL__c` — leave default unless directed to a regional deployment
5. Click **Save**.
**Verify** — three options, pick whichever you have access to:
1. From the App Launcher (waffle icon, top-left), search for **Developer Console**. It opens in a popup window.
2. In the popup, click **Debug** → **Open Execute Anonymous Window**.
3. Paste this Apex snippet, replacing the placeholder Lead ID with a real Lead from your Org:
```apex theme={null}
ChertSendIMessage.SendInput in = new ChertSendIMessage.SendInput();
in.phone = '+15555550123';
in.message = 'Test from anonymous Apex';
in.recordId = '00Q...your-test-Lead-id';
List out =
ChertSendIMessage.send(new List{ in });
System.debug(JSON.serializePretty(out[0]));
```
4. Check the **Open Log** box, then click **Execute**.
5. In the resulting log, search for `USER_DEBUG`. You should see:
```text theme={null}
USER_DEBUG|[7]|DEBUG|{
"ok" : true,
"messageId" : "msg_...",
"duplicate" : false,
"errorCode" : null,
"errorMessage" : null
}
```
1. Save the snippet above as `scripts/apex/ping-chert.apex`.
2. From the command palette: **SFDX: Execute Anonymous Apex with Editor Contents**.
3. Output appears in the VS Code Output panel under the **Apex** channel.
```bash theme={null}
echo 'ChertSendIMessage.SendInput in = new ChertSendIMessage.SendInput();
in.phone = "+15555550123";
in.message = "Test from anonymous Apex";
in.recordId = "00Q...your-test-Lead-id";
System.debug(JSON.serializePretty(
ChertSendIMessage.send(new List{ in })
));' | sf apex run --target-org
```
**What success looks like:** `ok: true`, a non-null `messageId`, and an
actual iMessage delivered to the recipient device within \~2 seconds.
**Common failures:**
| Output | Cause | Fix |
| ------------------------------------ | ------------------------------------------------------------------- | -------------------------------------------------------------- |
| `errorCode: signature_invalid` | `Signing_Secret__c` does not match what Chert provisioned | Re-paste the secret. Check for trailing whitespace/newline. |
| `errorCode: tenant_not_found` | `Tenant_Slug__c` does not match | Re-paste the slug. |
| `errorCode: phone_invalid` | `phone` not in E.164 format | Use `+1` prefix and digits only, no spaces or dashes. |
| `errorCode: all_servers_at_capacity` | Chert side has no free phone-line slot for this recipient right now | Not a config problem; retry in a few minutes or contact Chert. |
Treat `Signing_Secret__c` and `Ingest_Token__c` as production secrets.
Do not export them via the Metadata API to non-System Administrators.
The Custom Metadata record's **Protected Component** flag should be
set to **true** before any 2GP managed-package promotion.
**Chert handles this step.** During the pairing call in step 5, Chert
will:
1. Install the **Chert Notifications** Slack app into your workspace.
2. Bind the app to the channel you nominate (typically `#chert-replies`
or a channel scoped to the team that owns outbound).
3. Configure the per-channel feature flags (daily summary canvas,
low-leads alert, settings mirror).
Customer-side action: have a workspace admin available to authorize
the Slack OAuth install when Chert sends the install link. \~2 minutes
of admin time.
**Verify:** Once bound, ask Chert to fire a test reply notification.
The card should appear in the bound channel with a conversation
preview, an AI-drafted suggested reply, and a **Review & reply →**
deep-link to the Chert console.
See [Slack notifications](/slack/notifications) for the full card
anatomy and the thread-reply triage flow.
If your team already runs email outreach in Outreach, Salesloft, or a
Salesforce-native sequencer and wants iMessage to fire as a follow-up
step, this is one Flow plus one invocable action.
1. From Setup, enter **Flow** → **New Flow** → **Record-Triggered Flow**.
2. Object: **Lead** (or Contact, or your sequencer's enrollment object).
3. Trigger: **A record is updated**.
4. Entry condition: whatever your sequencer sets to mark a step as **complete** and ready to hand off (e.g., `Outreach_Step__c = 'iMessage'`).
5. Add an **Action** element. Search for **Chert Send iMessage**.
6. Bind:
* `phone` → `{!$Record.MobilePhone}` (or `Phone`)
* `message` → a text template, e.g., `Hey {!$Record.FirstName}, following up on the email I sent.`
* `recordId` → `{!$Record.Id}`
* `idempotencyKey` → `{!$Record.Id}:imessage:1` (deterministic; replays are no-ops)
7. Add a **Decision** branch on the action's `duplicate` output:
* `duplicate = true` → log success but don't re-send
* `ok = false` → write the error to a custom field for retry
8. Save and activate the Flow.
**Verify:** Trigger the entry condition manually on one test record.
Within \~1 second the Flow runs; within \~2 seconds the recipient sees
the iMessage; within a few seconds the `Chert_Message__c` row plus a
standard `Task` appear on the record's Activity Timeline.
## Verify the Installation End-to-End
Once all seven steps are complete:
1. Open any Lead with a valid mobile number.
2. Open the **Chert Messaging** component → **Conversation** tab.
3. Type a test message and click **Send**. The bubble should appear with a status indicator.
4. From Setup → **Apex Jobs**, confirm no failed `ChertEnrich` jobs.
5. From Setup → **Setup Audit Trail**, search for `Chert_` to confirm the install + configuration entries.
6. Reply from the recipient device. Within a few seconds, the inbound bubble appears in the Conversation tab and a `Chert_Message__c` row + a standard `Task` are inserted on the Lead.
## Troubleshoot
The package does not perform mixed DML on its own. Investigate your
Org's test data factory or any triggers that fire during package
test execution.
The Lightning Record Page is not active for the user's profile, app,
or record type. From **Lightning App Builder**, open the page, click
**Activation**, and confirm the scope covers the user trying to view
the record.
The running user does not have the **Chert Messaging User** Permission
Set, or the Permission Set is missing Apex class access to
`ChertSendIMessage`. Re-assign in step 2.
The `Chert_Endpoint` Named Credential URL was overwritten. Reset to
`https://console.trychert.com/api/salesforce/v1` from Setup → **Named
Credentials** → **Chert Endpoint**.
The `Signing_Secret__c` in your `Chert_Tenant.Default` record does not
match what Chert provisioned. Re-paste from the secure handoff and
confirm there is no trailing whitespace or newline.
Either the `Ingest_Token__c` is wrong (Chert can't authenticate to the
ingestion REST endpoint) or your Org's network rules block inbound
HTTPS from Chert's webhook range. Ask Chert to replay the most recent
event from `console.trychert.com → Events → Replay`. If the replay
401s, fix the token; if it 500s with a network error, contact your
network admin.
## Upgrade from a Previous Version
Re-run `sf project deploy start` against the same target Org with the
new source tree. Custom Metadata records, Permission Set assignments,
and Lightning Record Page activations are preserved. Active Flows
referencing `ChertSendIMessage` continue to work as long as the
action's input contract is unchanged. Coordinate breaking changes per
version with Chert.
## What's next
Once the seven steps are complete and the end-to-end test in **Verify
the Installation End-to-End** passes, you're live. Next:
Hands-on walkthrough: open a Lead, send a real iMessage, observe the round-trip.
Per-component reference for Permission Set scope, Custom Metadata fields, and Quick Action behavior.
Coordinate with Chert on the first sequence template, send window, and phone-line allocation.
Trust boundary, HMAC format, and sharing posture per Apex class. Share with your security review team.
## See Also
* [Configuration](/salesforce/configuration) for per-component setup detail.
* [Architecture](/salesforce/architecture) for the component map, sequence diagrams, and ERD.
* [Limits and Considerations](/salesforce/limits) for governor-limit math.
Activation is **per-environment**. A sandbox-active page does not
auto-activate in production. Repeat this step on each Org you deploy to.
If your Org already has a customized Lead/Contact record page, you can
skip the shipped Flexipages and instead drop the `chertConversation`
LWC component directly onto your existing page from Lightning App
Builder. The component is exposed under the **Custom — Managed**
section of the components palette.
Two Quick Actions ship with the package and need to be exposed on
Contact list views so reps can run them in bulk.
| Quick Action | Component | Purpose |
| ---------------------- | ----------------------- | ----------------------------------------------------------- |
| `Enrich_Phone_Numbers` | `chertBulkEnrich` | Bulk-enrich missing mobile numbers across selected Contacts |
| `Start_Chert_Sequence` | `chertSequenceLauncher` | Enroll selected Contacts into a Chert sequence |
To expose them on the Contact list view:
1. From Setup → **Object Manager** → **Contact** → **Search Layouts for Salesforce Classic** (or **List View Button Layout** in Lightning).
2. Edit the **List View** layout.
3. Add **Enrich Phone Numbers** and **Start Chert Sequence** to the **Selected Buttons** list.
4. Save.
**Verify:** Open the Contacts tab in Lightning Experience, switch to
any list view with selectable rows, select a few Contacts, and confirm
both Quick Action buttons appear in the action bar.
**Checkpoint — you should now be able to:**
* Open any Lead, Contact, or Account record and see the three-tab Chert Messaging component
* Open the Contacts list view, select rows, and see the **Enrich Phone Numbers** + **Start Chert Sequence** buttons
* See `Chert_Message__c` and `Chert_Tenant__mdt` in **Object Manager**
* Find **Chert Messaging User** under Permission Sets
If any of those are missing, fix before moving to step 5. Step 5
sends real network traffic to Chert and assumes the package is fully
installed and assigned.
This step pastes the credentials Chert provisioned for your Org into
the package's tenant configuration. Most customers do this on a
30-minute pairing call with Chert; the call confirms credentials are
correct before any traffic flows.
1. From Setup, enter **Custom Metadata Types**.
2. Click **Manage Records** next to **Chert Tenant**.
3. Edit the **Default** record.
4. Paste these values from your Chert onboarding handoff:
* `Tenant_Slug__c` — your Org's identifier with Chert
* `Signing_Secret__c` — HMAC-SHA256 key for outbound requests
* `Ingest_Token__c` — bearer token Chert presents on inbound webhooks
* `Chert_Base_URL__c` — leave default unless directed to a regional deployment
5. Click **Save**.
**Verify** — three options, pick whichever you have access to:
1. From the App Launcher (waffle icon, top-left), search for **Developer Console**. It opens in a popup window.
2. In the popup, click **Debug** → **Open Execute Anonymous Window**.
3. Paste this Apex snippet, replacing the placeholder Lead ID with a real Lead from your Org:
```apex theme={null}
ChertSendIMessage.SendInput in = new ChertSendIMessage.SendInput();
in.phone = '+15555550123';
in.message = 'Test from anonymous Apex';
in.recordId = '00Q...your-test-Lead-id';
List out =
ChertSendIMessage.send(new List{ in });
System.debug(JSON.serializePretty(out[0]));
```
4. Check the **Open Log** box, then click **Execute**.
5. In the resulting log, search for `USER_DEBUG`. You should see:
```text theme={null}
USER_DEBUG|[7]|DEBUG|{
"ok" : true,
"messageId" : "msg_...",
"duplicate" : false,
"errorCode" : null,
"errorMessage" : null
}
```
1. Save the snippet above as `scripts/apex/ping-chert.apex`.
2. From the command palette: **SFDX: Execute Anonymous Apex with Editor Contents**.
3. Output appears in the VS Code Output panel under the **Apex** channel.
```bash theme={null}
echo 'ChertSendIMessage.SendInput in = new ChertSendIMessage.SendInput();
in.phone = "+15555550123";
in.message = "Test from anonymous Apex";
in.recordId = "00Q...your-test-Lead-id";
System.debug(JSON.serializePretty(
ChertSendIMessage.send(new List{ in })
));' | sf apex run --target-org
```
**What success looks like:** `ok: true`, a non-null `messageId`, and an
actual iMessage delivered to the recipient device within \~2 seconds.
**Common failures:**
| Output | Cause | Fix |
| ------------------------------------ | ------------------------------------------------------------------- | -------------------------------------------------------------- |
| `errorCode: signature_invalid` | `Signing_Secret__c` does not match what Chert provisioned | Re-paste the secret. Check for trailing whitespace/newline. |
| `errorCode: tenant_not_found` | `Tenant_Slug__c` does not match | Re-paste the slug. |
| `errorCode: phone_invalid` | `phone` not in E.164 format | Use `+1` prefix and digits only, no spaces or dashes. |
| `errorCode: all_servers_at_capacity` | Chert side has no free phone-line slot for this recipient right now | Not a config problem; retry in a few minutes or contact Chert. |
Treat `Signing_Secret__c` and `Ingest_Token__c` as production secrets.
Do not export them via the Metadata API to non-System Administrators.
The Custom Metadata record's **Protected Component** flag should be
set to **true** before any 2GP managed-package promotion.
**Chert handles this step.** During the pairing call in step 5, Chert
will:
1. Install the **Chert Notifications** Slack app into your workspace.
2. Bind the app to the channel you nominate (typically `#chert-replies`
or a channel scoped to the team that owns outbound).
3. Configure the per-channel feature flags (daily summary canvas,
low-leads alert, settings mirror).
Customer-side action: have a workspace admin available to authorize
the Slack OAuth install when Chert sends the install link. \~2 minutes
of admin time.
**Verify:** Once bound, ask Chert to fire a test reply notification.
The card should appear in the bound channel with a conversation
preview, an AI-drafted suggested reply, and a **Review & reply →**
deep-link to the Chert console.
See [Slack notifications](/slack/notifications) for the full card
anatomy and the thread-reply triage flow.
If your team already runs email outreach in Outreach, Salesloft, or a
Salesforce-native sequencer and wants iMessage to fire as a follow-up
step, this is one Flow plus one invocable action.
1. From Setup, enter **Flow** → **New Flow** → **Record-Triggered Flow**.
2. Object: **Lead** (or Contact, or your sequencer's enrollment object).
3. Trigger: **A record is updated**.
4. Entry condition: whatever your sequencer sets to mark a step as **complete** and ready to hand off (e.g., `Outreach_Step__c = 'iMessage'`).
5. Add an **Action** element. Search for **Chert Send iMessage**.
6. Bind:
* `phone` → `{!$Record.MobilePhone}` (or `Phone`)
* `message` → a text template, e.g., `Hey {!$Record.FirstName}, following up on the email I sent.`
* `recordId` → `{!$Record.Id}`
* `idempotencyKey` → `{!$Record.Id}:imessage:1` (deterministic; replays are no-ops)
7. Add a **Decision** branch on the action's `duplicate` output:
* `duplicate = true` → log success but don't re-send
* `ok = false` → write the error to a custom field for retry
8. Save and activate the Flow.
**Verify:** Trigger the entry condition manually on one test record.
Within \~1 second the Flow runs; within \~2 seconds the recipient sees
the iMessage; within a few seconds the `Chert_Message__c` row plus a
standard `Task` appear on the record's Activity Timeline.
## Verify the Installation End-to-End
Once all seven steps are complete:
1. Open any Lead with a valid mobile number.
2. Open the **Chert Messaging** component → **Conversation** tab.
3. Type a test message and click **Send**. The bubble should appear with a status indicator.
4. From Setup → **Apex Jobs**, confirm no failed `ChertEnrich` jobs.
5. From Setup → **Setup Audit Trail**, search for `Chert_` to confirm the install + configuration entries.
6. Reply from the recipient device. Within a few seconds, the inbound bubble appears in the Conversation tab and a `Chert_Message__c` row + a standard `Task` are inserted on the Lead.
## Troubleshoot
The package does not perform mixed DML on its own. Investigate your
Org's test data factory or any triggers that fire during package
test execution.
The Lightning Record Page is not active for the user's profile, app,
or record type. From **Lightning App Builder**, open the page, click
**Activation**, and confirm the scope covers the user trying to view
the record.
The running user does not have the **Chert Messaging User** Permission
Set, or the Permission Set is missing Apex class access to
`ChertSendIMessage`. Re-assign in step 2.
The `Chert_Endpoint` Named Credential URL was overwritten. Reset to
`https://console.trychert.com/api/salesforce/v1` from Setup → **Named
Credentials** → **Chert Endpoint**.
The `Signing_Secret__c` in your `Chert_Tenant.Default` record does not
match what Chert provisioned. Re-paste from the secure handoff and
confirm there is no trailing whitespace or newline.
Either the `Ingest_Token__c` is wrong (Chert can't authenticate to the
ingestion REST endpoint) or your Org's network rules block inbound
HTTPS from Chert's webhook range. Ask Chert to replay the most recent
event from `console.trychert.com → Events → Replay`. If the replay
401s, fix the token; if it 500s with a network error, contact your
network admin.
## Upgrade from a Previous Version
Re-run `sf project deploy start` against the same target Org with the
new source tree. Custom Metadata records, Permission Set assignments,
and Lightning Record Page activations are preserved. Active Flows
referencing `ChertSendIMessage` continue to work as long as the
action's input contract is unchanged. Coordinate breaking changes per
version with Chert.
## What's next
Once the seven steps are complete and the end-to-end test in **Verify
the Installation End-to-End** passes, you're live. Next:
Hands-on walkthrough: open a Lead, send a real iMessage, observe the round-trip.
Per-component reference for Permission Set scope, Custom Metadata fields, and Quick Action behavior.
Coordinate with Chert on the first sequence template, send window, and phone-line allocation.
Trust boundary, HMAC format, and sharing posture per Apex class. Share with your security review team.
## See Also
* [Configuration](/salesforce/configuration) for per-component setup detail.
* [Architecture](/salesforce/architecture) for the component map, sequence diagrams, and ERD.
* [Limits and Considerations](/salesforce/limits) for governor-limit math.